Overview
This document will demonstrate how to migrate a database from Amazon Aurora (MySQL compatible) to PlanetScale. We’ll also address some common issues associated with migrating from Amazon Aurora and how to resolve them.NoteThis guide assumes you are using Amazon Aurora (MySQL compatible) on RDS. If you are using MySQL on Amazon RDS, follow the Amazon RDS for MySQL migration guide. Other database systems (non-MySQL or MariaDB databases) available through RDS will not work with the PlanetScale import tool.
Prerequisites
Before you can perform a migration, you’ll need to make sure the following is configured:- Your database’s GTID, sql_mode, and binlog_format settings are properly configured.
- Your database’s binlog retention settings are properly configured.
- The ability to create a new user in the database.
- Your database is publicly accessible.
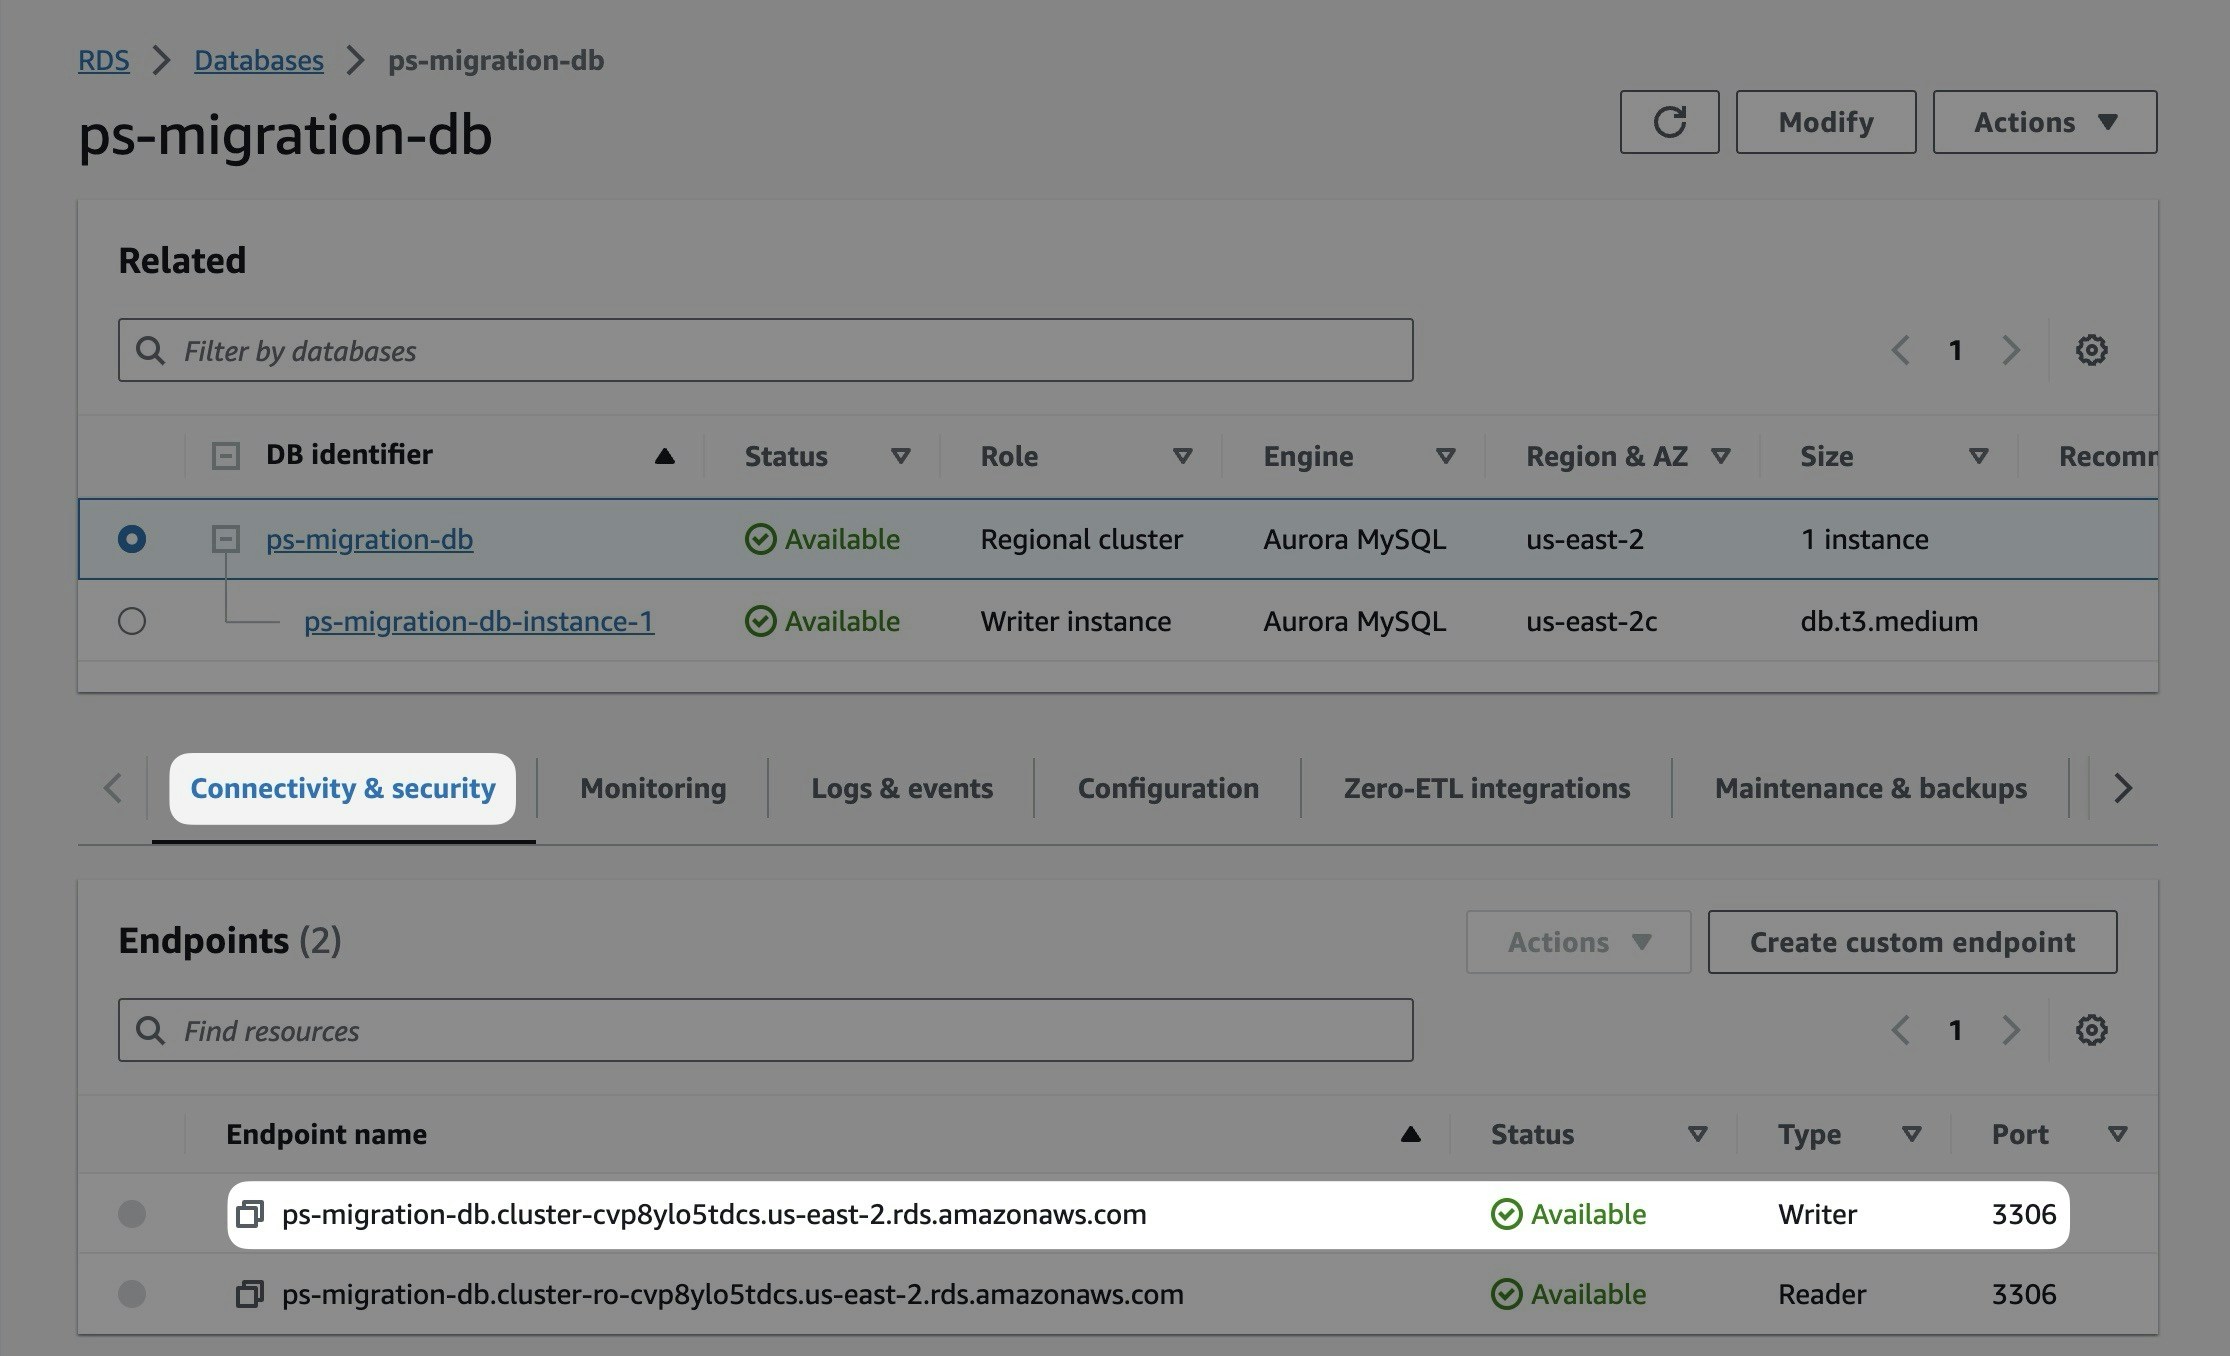
- Database cluster endpoint address (Note: Not the reader or writer instances)
- Port number (E.g., 3306)
Importing your database
Step 1: Create a migration user
You will need to create a new set of credentials inside of your database for the migration tool to have the correct permissions. This MySQL script can be used to create a user with the necessary permissions inside of your database. You will need appropriate database permissions to run the script. The username will bemigration_user. Make sure to update the following variables:
<SUPER_STRONG_PASSWORD>— The password for themigration_useraccount.<DATABASE_NAME>— The name of the database you will import into PlanetScale.
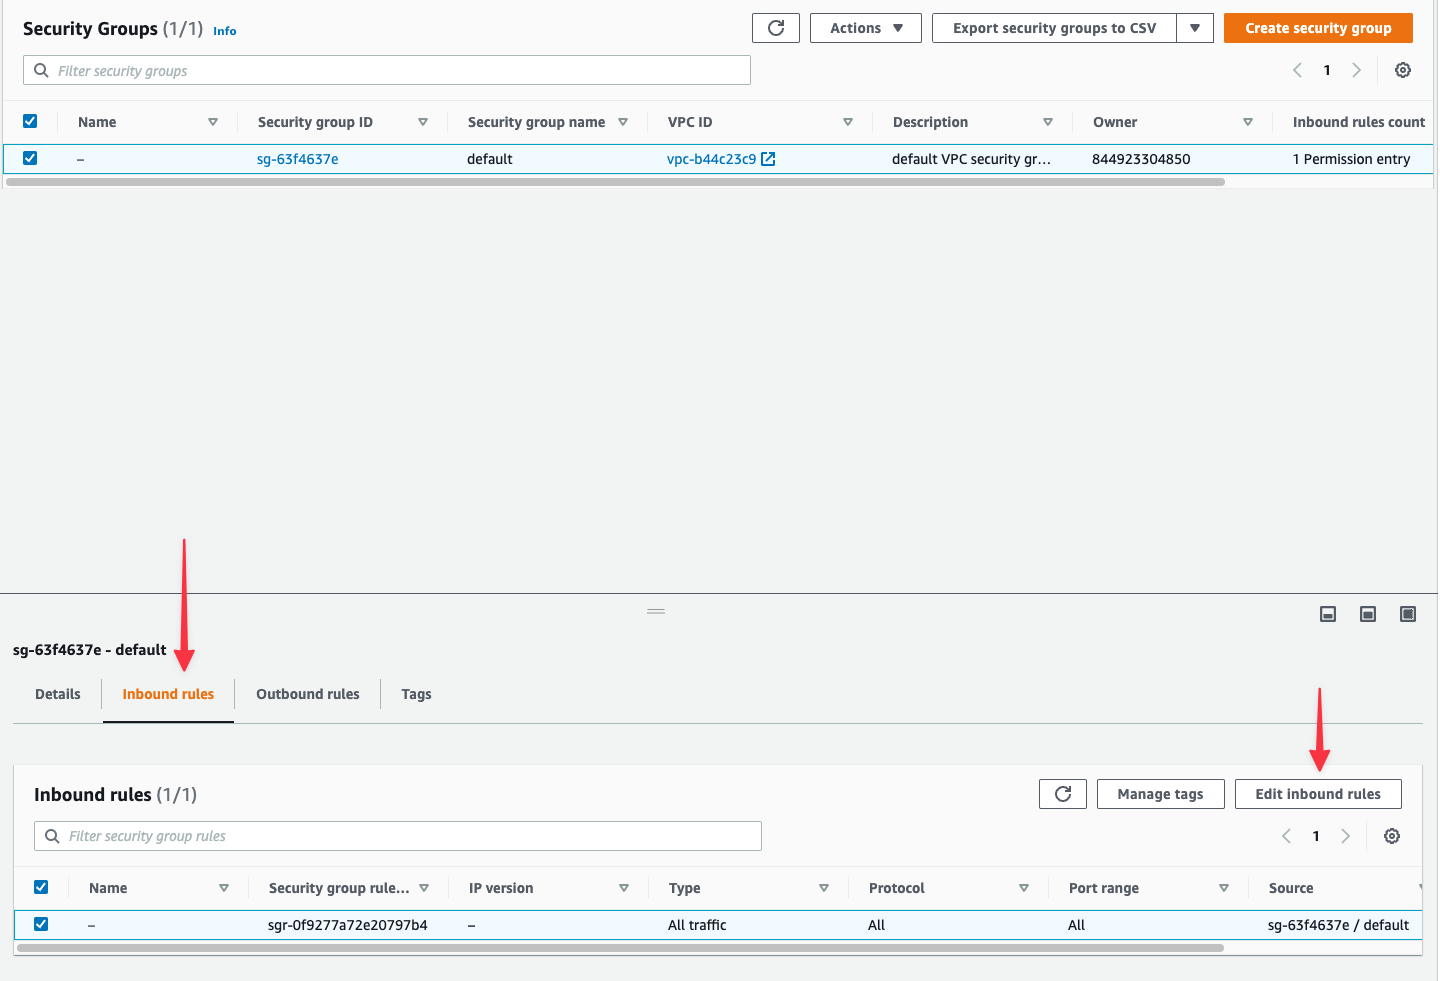
Step 2: Configuring the RDS security group
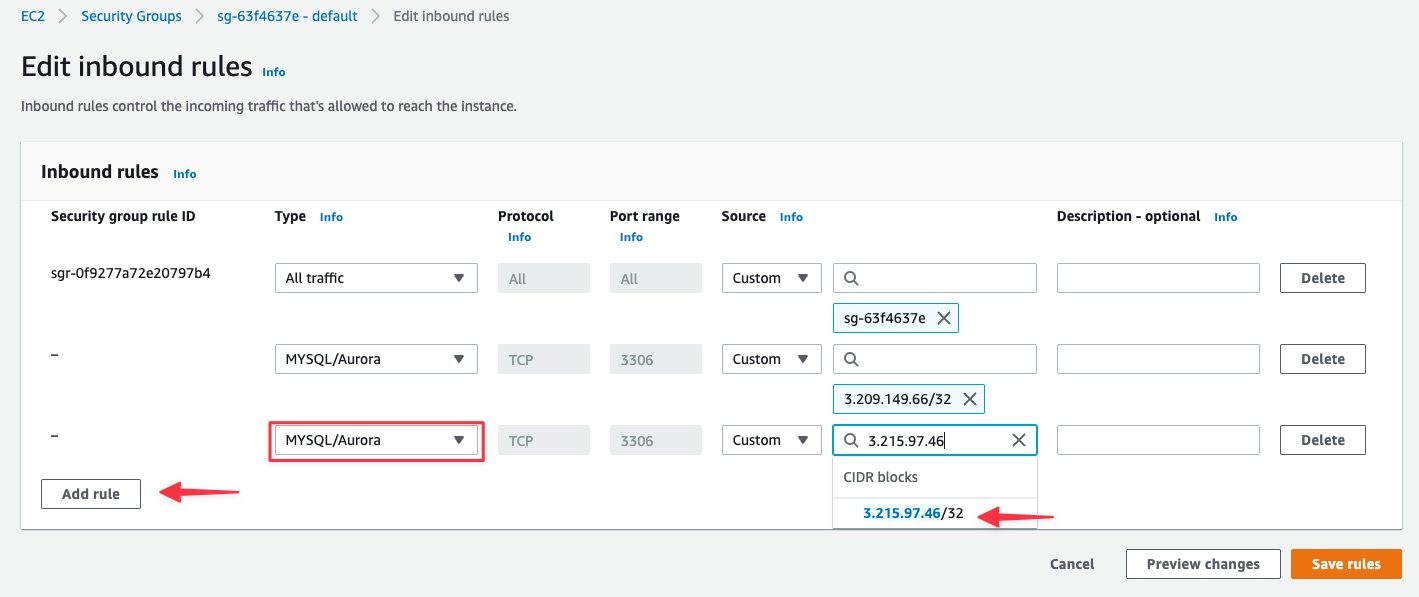
In order for PlanetScale to connect to your RDS database, you must allow traffic into the database through the associated security group. The specific IP addresses you will need to allow depend on the region where you plan to host your PlanetScale database. Check the right side of the Import tool form, which changes based on the region you select, or see the Import tool public IP addresses docs to determine the IP addresses to allow before continuing. This guide will use the AWS us-east-2 (Ohio) region, so we’ll allow the following addresses: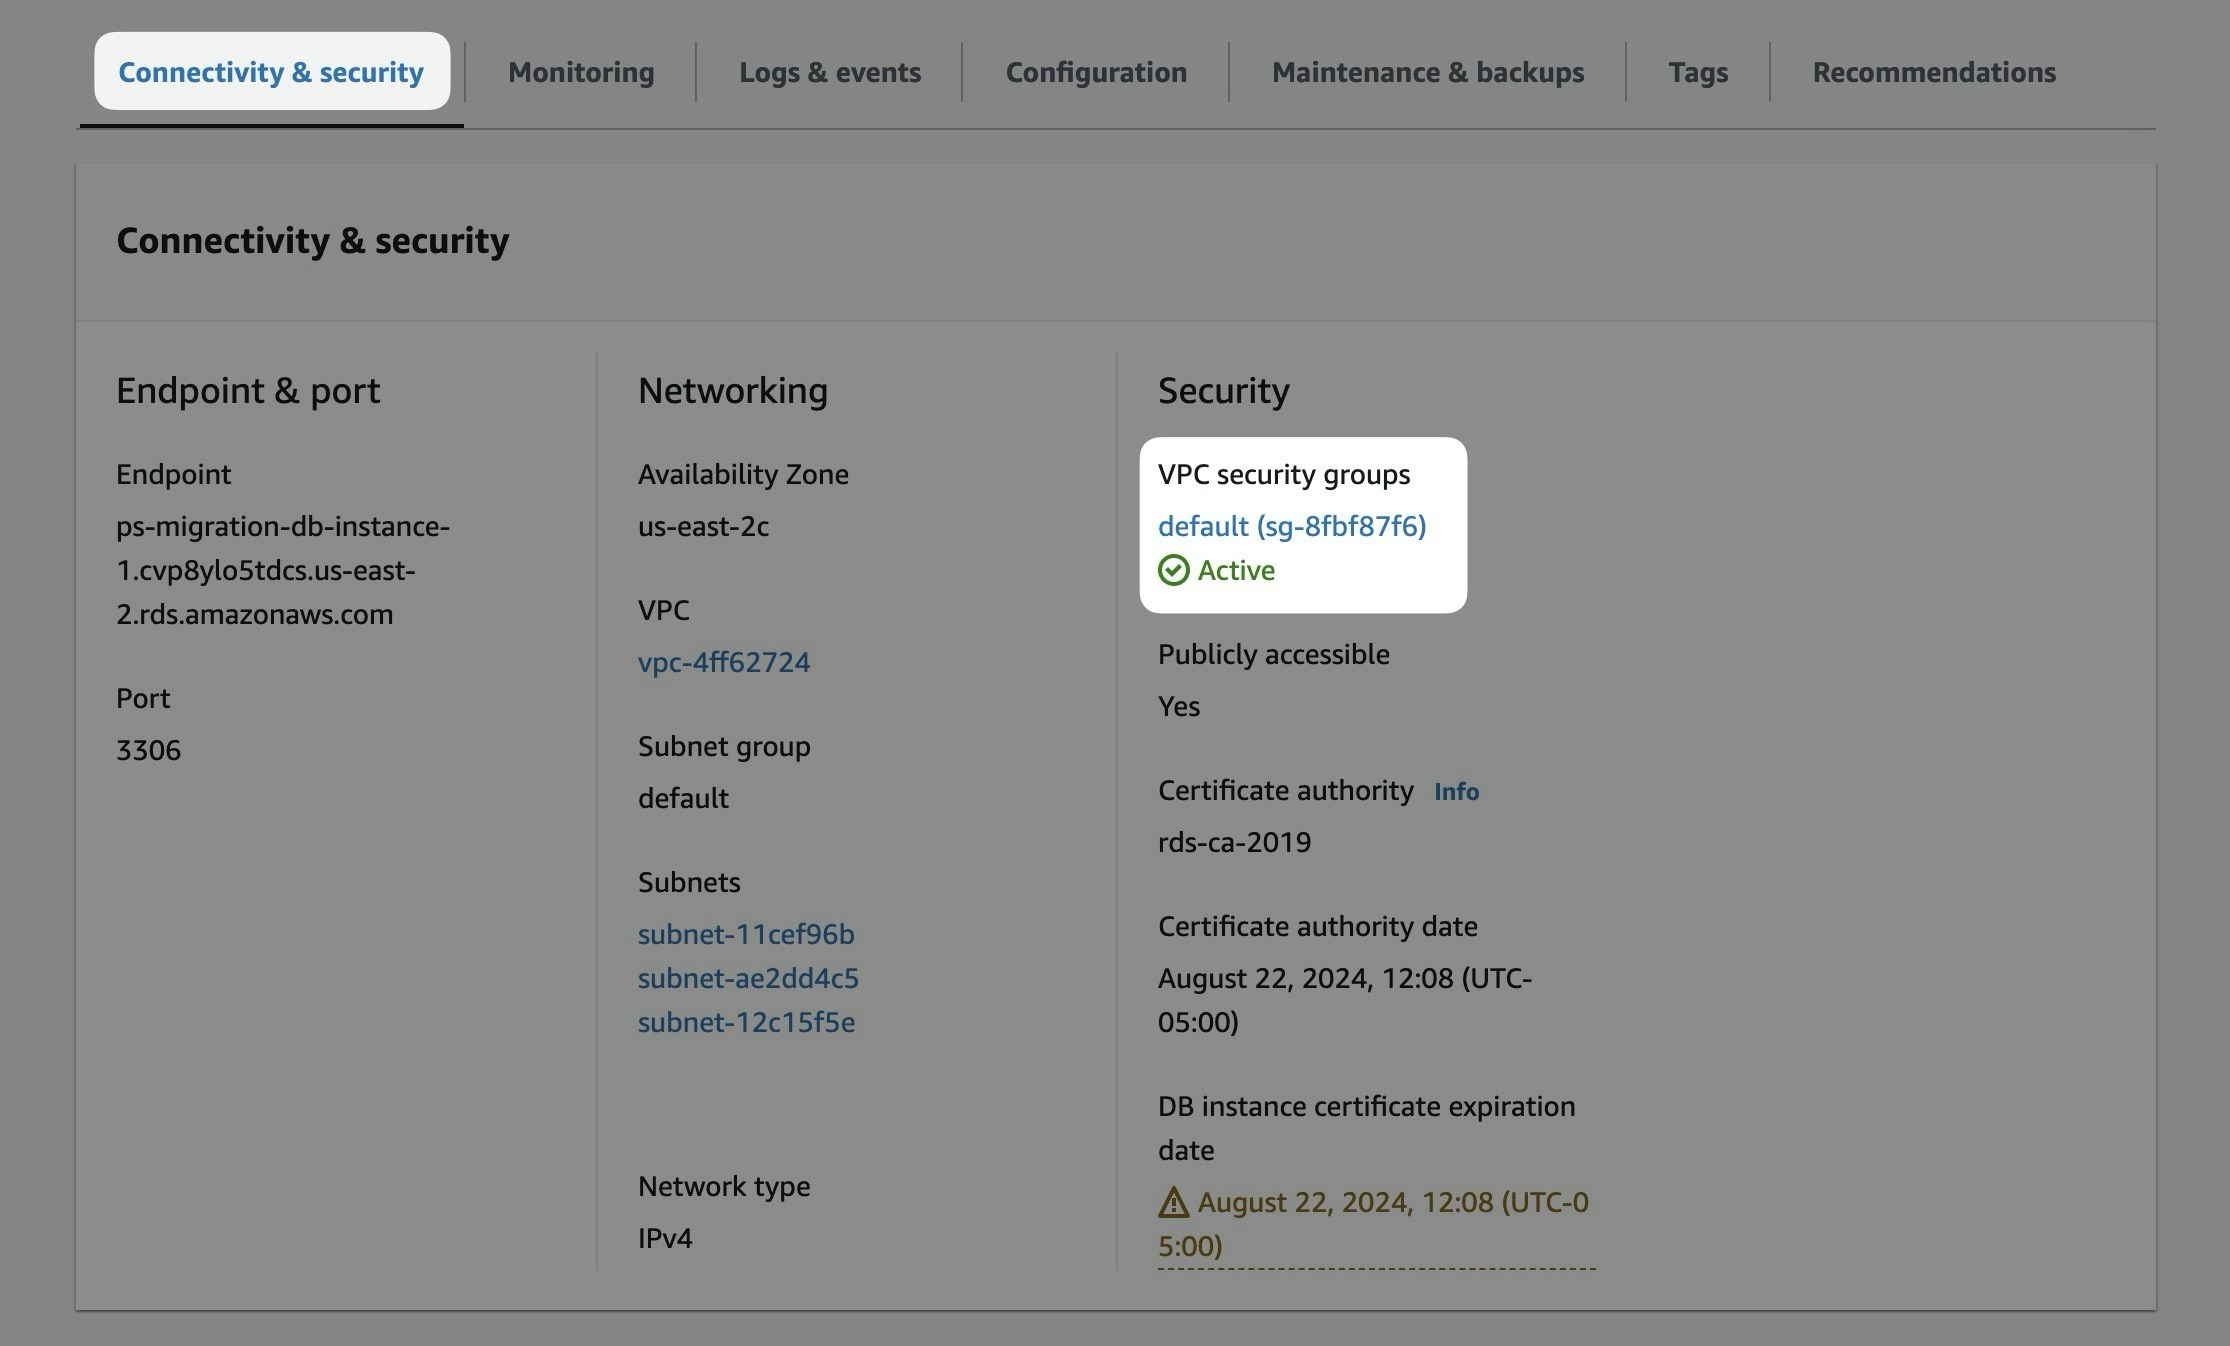
x.x.x.x/32, so you can select that when it appears. You’ll need to repeat this for every IP address you need to allow.
Step 3: Using the PlanetScale import tool
In the PlanetScale dashboard, click “New database”, then “Import database”. Complete the form using the information gathered in the previous section. Click “Connect to database”, and the import tool will attempt to connect to your Aurora instance.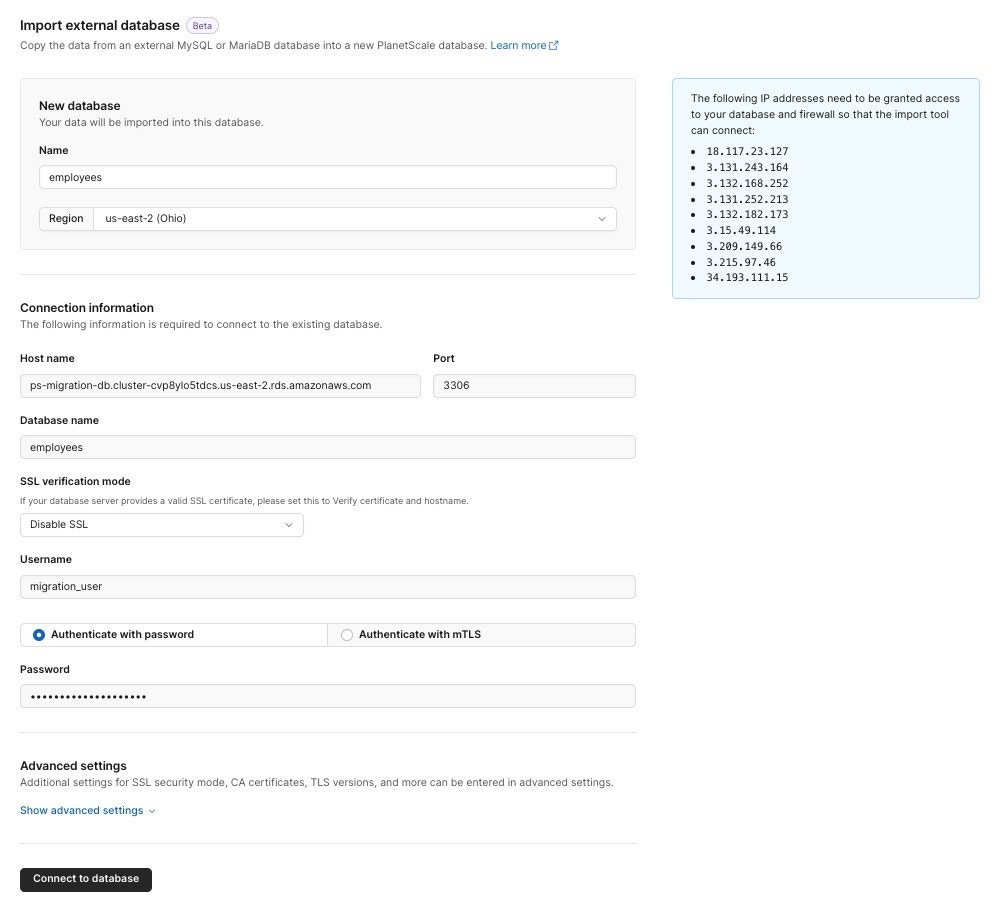
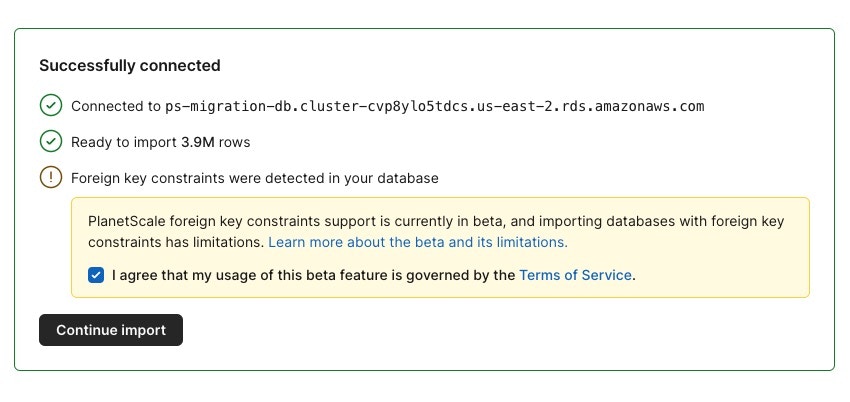
NoteIf your database uses foreign key constraints, we will detect them after successfully connecting to your external database and automatically enable foreign key constraint support for your database.
If you receive an error, check the Troubleshooting section for information on correcting common configuration issues.
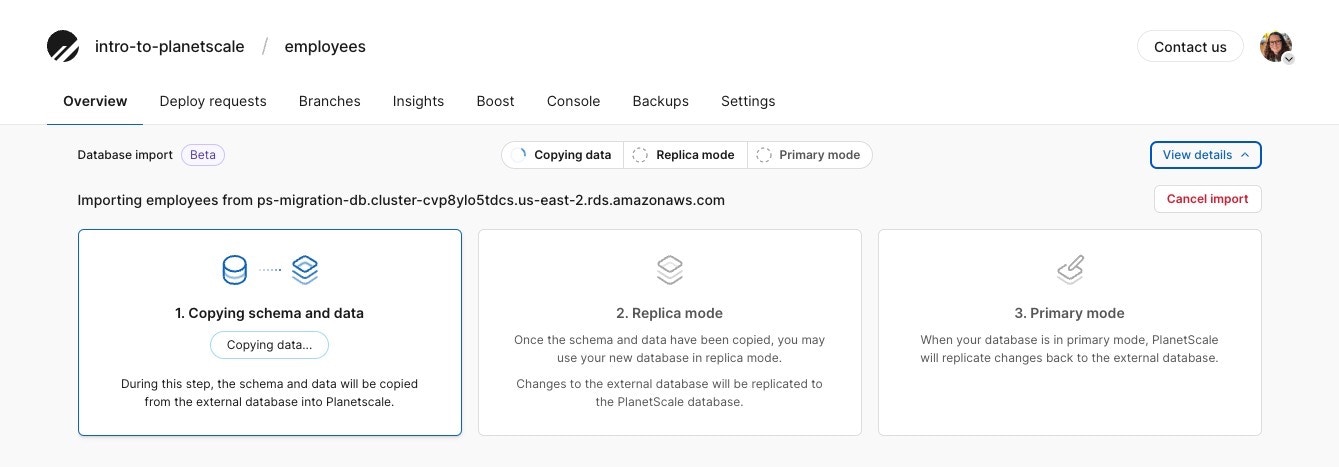
- Enable replica mode — Reverts the change performed in the previous step, making Aurora your primary once again.
- Finish import — Detaches the databases from replication. Future changes to either the PlanetScale database or the Aurora database will not be replicated to each other.
Troubleshooting
Configure GTID, sql_mode, and binlog settings
If you see any errors below or want to make sure your Amazon Aurora database settings are correctly set, follow the following steps:external database settings are not compatible with PlanetScale: "gtid_mode" must be "ON", but found: "OFF_PERMISSIVE"(similar error forenforce_gtid_consistency)external database settings are not compatible with PlanetScale: "log_bin" must be "ON", but found: "OFF"external database settings are not compatible with PlanetScale: PlanetScale requires "sql_mode" to have the following options set: "NO_ZERO_IN_DATE, NO_ZERO_DATE, ONLY_FULL_GROUP_BY"

1
If you are using the default DB cluster parameter group, you’ll need to create a new parameter group to reconfigure a few settings.To create a parameter group, select “Parameter groups” from the left nav and then “Create parameter group”.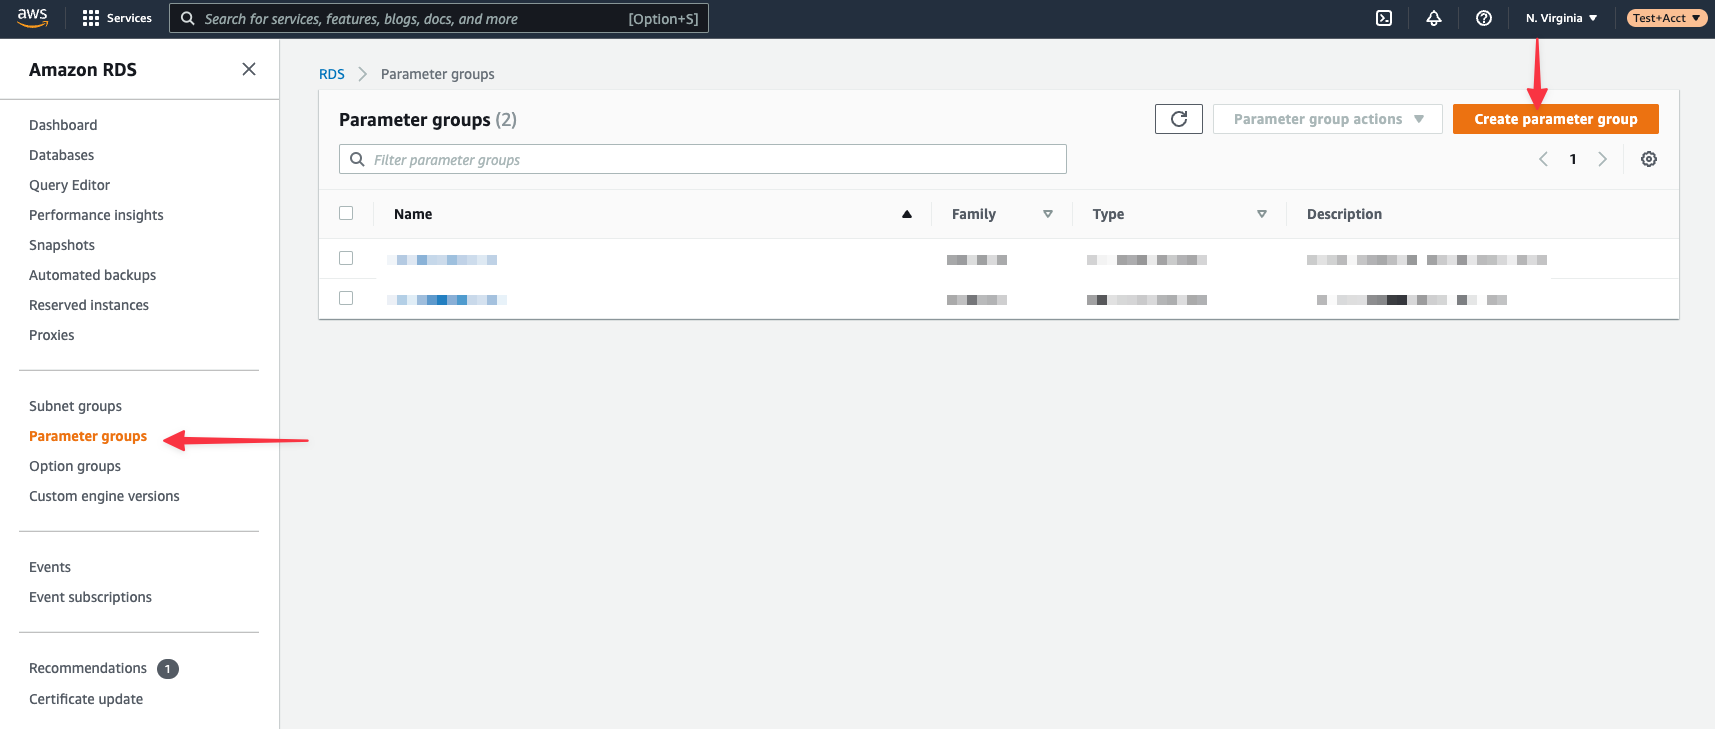
- Parameter group family: aurora-mysql8.0
- Type: DB Cluster Parameter Group (Note: It is not DB Parameter Group type, which will not have all the same settings available.)
- Group name: psmigrationgroup (or whatever you choose)
- Description: Give it a descriptive name for your notes
2
Next, you need to edit the settings in your custom DB cluster parameter group. Select your new parameter group from the list to modify the settings.Click “Edit parameters” to unlock editing.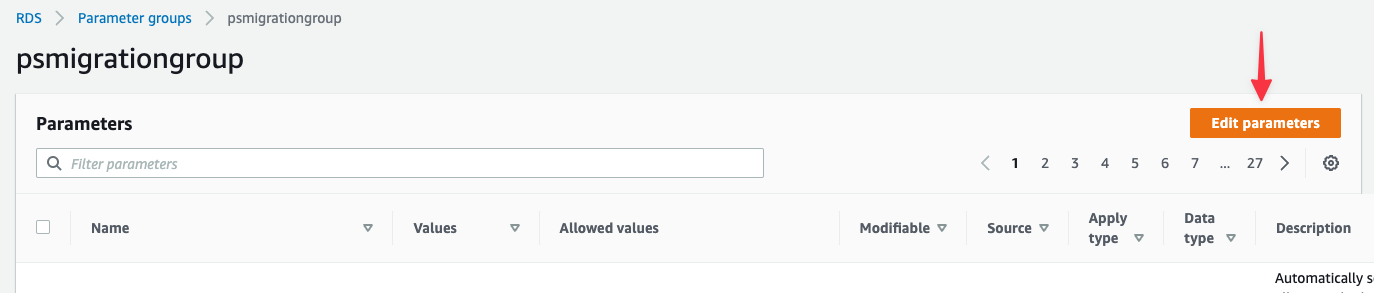
- gtid-mode: ON
- enforce_gtid_consistency: ON
- sql_mode: NO_ZERO_IN_DATE,NO_ZERO_DATE,ONLY_FULL_GROUP_BY
- binlog_format: ROW
3
Next, you must associate the DB cluster parameter group to the database. Select “Databases” from the left nav, select your database regional cluster (not the writer or reader instance), and click “Modify” from the toolbar.Scroll halfway down the page and find the section titled Additional configuration. Update the DB cluster parameter group to match the new group created earlier in this section. Scroll to the bottom and click “Continue”.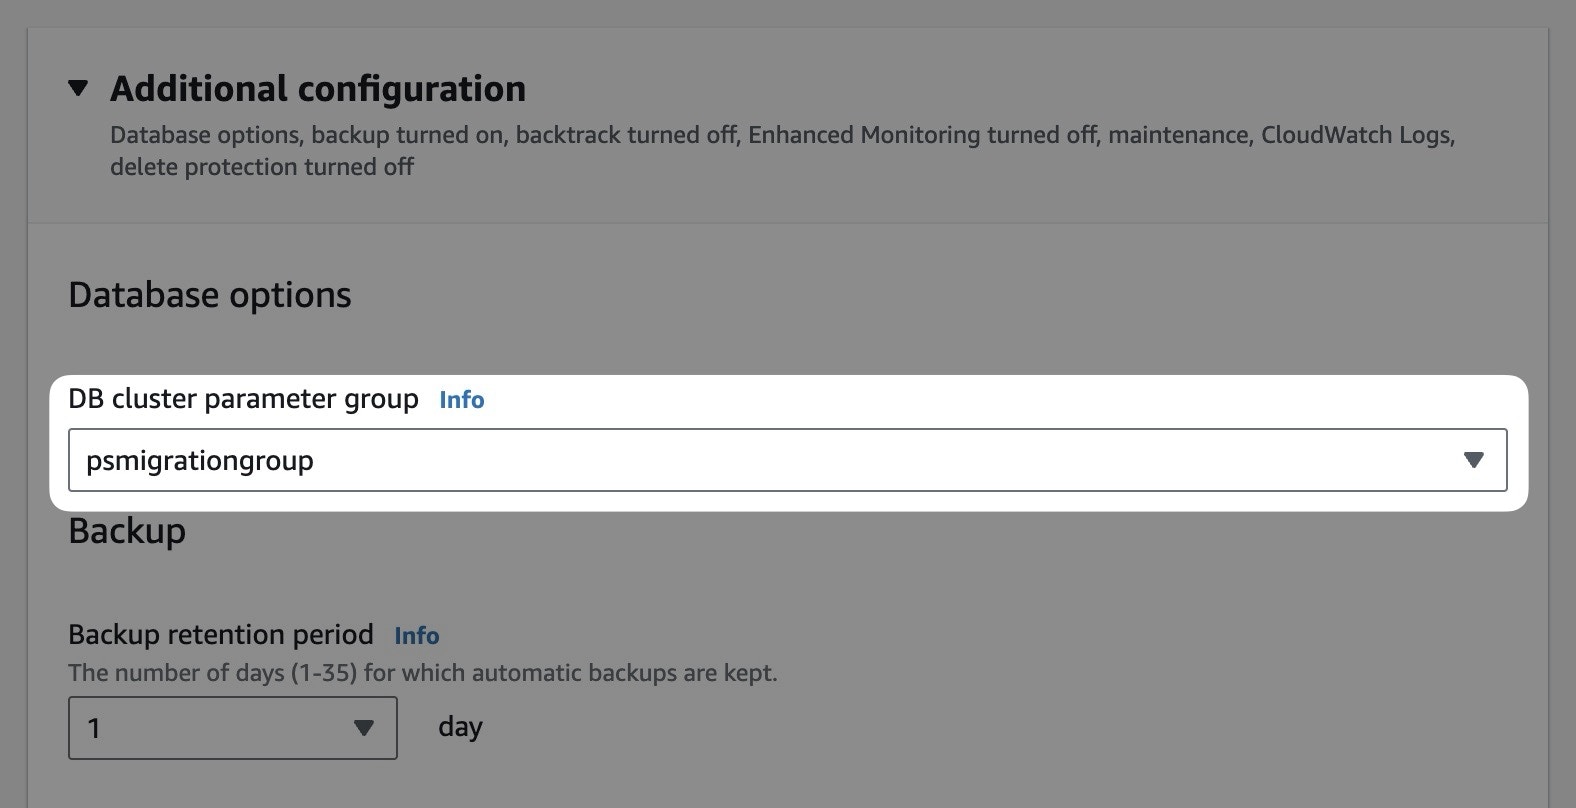
- If you select Apply during the next scheduled maintenance window, the updated configuration group will be applied during that window.
- If you select Apply immediately, the group will be applied immediately, but you must manually reboot the database for the changes to take effect.
4
You will need to reboot your database’s writer instance to apply these specific settings. To reboot the writer instance, click the “Actions” button near the top of the screen, then “Reboot”. If you do not see a reboot option, ensure you are not selecting your database’s regional cluster.You’ll be presented with a page to confirm the database you want to reboot. Click “Confirm”, and the database will begin rebooting.You can view the status of the database in the primary list of databases for this account/region. This view does not refresh automatically, click the refresh icon to update the view.
This will briefly disconnect any users who are actively using the database! Proceed with caution. The DB cluster parameter group will not apply without a reboot.
Configure binlog retention hours
You may need to specify the number of hours to retain binary logs in your Amazon Aurora database. By default, this value isNULL, which means that binary logs are purged immediately.
You need to specify a period with enough time for replication to occur. For most cases, 48 hours should be sufficient, but you may need to set it higher for large imports.
Keep in mind that you can go to longer binlog retention periods at the cost of extra disk space on your source database. You should evaluate how large your binlogs are for daily use to determine if you would like to increase the value beyond 48 hours, as there’s a chance you may run out of disk space, depending on your configuration. If you need assistance, please contact the PlanetScale Support team.
mysql.rds_set_configuration() stored procedure as shown in the following example:
Enable binary logging
If binary logging is disabled on your database cluster, you’ll receive an error like this from the import tool:log_bin to on, enable automated backups by setting their retention period to any value greater than zero days.
Once that change has been applied, you can verify that log_bin is on in a MySQL session: